APPSeCONNECT provides a lot of features for its customers. Some of them are very common and can be readily used after registering for an account. In this knowledgebase, we will talk about some of the uncommon features of security that let you correctly secure your account.
5 Uncommon Security Features of APPSeCONNECT
1. Enable Two-factor Authentication for your Account
One of the major security measures that you want to take to make sure your account is secure even though you have compromised your password is to enable two-factor authentication. With this feature, after you log in, every time you will get a notification either in SMS or through Call or through Email with a secure passcode. You need this code to successfully log in to the portal.
To enable, follow the steps:
- If this is your first login, you will get notified to change your password, and then to enable “Two-factor Authentication”.
- Otherwise, you can enable it from the Profile section of your account.
- To enable from Profile, just click on My Profile from the extreme right side menu on the screen.
- In the Profile Section Select “Change Details” and select Personal Info.
- You can check the “Two Factor Authentication”. It will verify your phone number and you are done.
- Save Changes to take this effect.
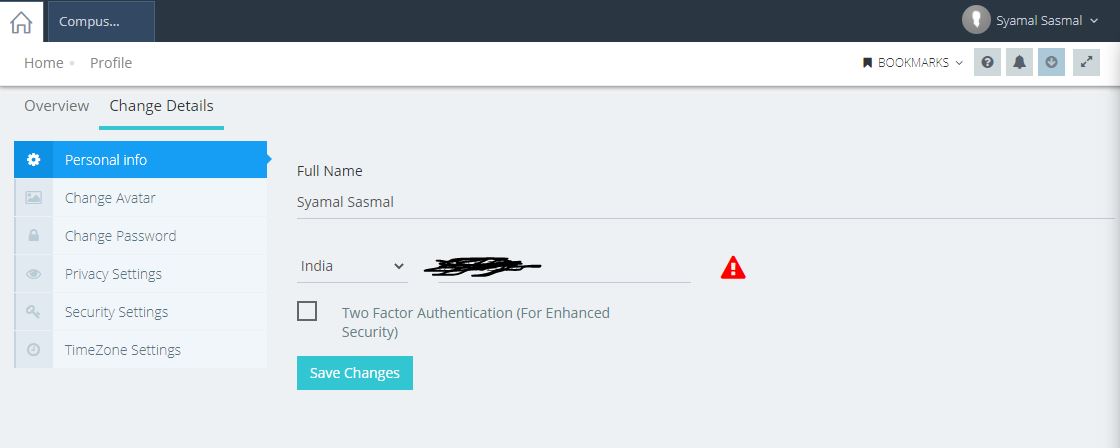
After Two Factor is Authenticated, the login will prompt for an extra passcode to log in.
2. Enable Password Expiry
Password expiry will ask for a new password every Two or Three months depending on the setup you have configured in your account. This gives an extra level of security such that if your password is compromised, regular changes in password will secure your account.
To enable, follow the steps:
- If this is your first login, you will get notified to change your password, and then to enable “Password Expiry”.
- Otherwise, you can enable it from the Profile section of your account.
- To enable from Profile, just click on My Profile from the extreme right side menu on the screen.
- In the Profile Section Select “Change Details” and select Security Settings.
- You can check the “Enable Password Expiry”. It will show a dropdown to set up an expiry of either One month, two months or three months.
- Save Changes to take this effect.
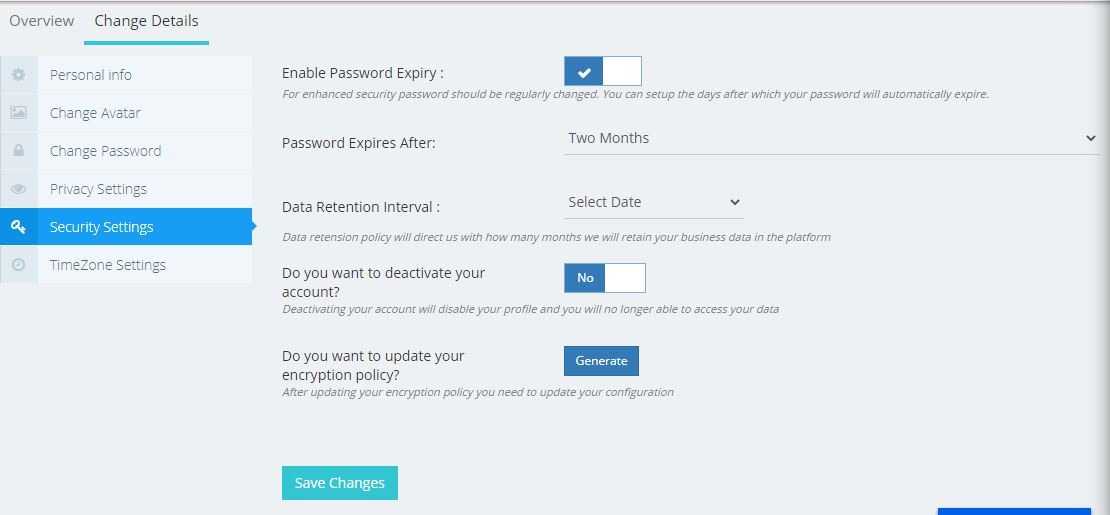
After enabling password expiry, it will ask to change the password after every 1 – 3 months depending on the setup.
3. Store transaction data in Secure Vault for On-premise Agent
Transactions need some metadata to be stored on the fly in environments. These environments capture transaction data, last date records, last ids, etc. In case of disaster or if the environment is compromised, you will get an option to retrieve this information such that transactions are correctly configured again.
To enable, follow the steps:
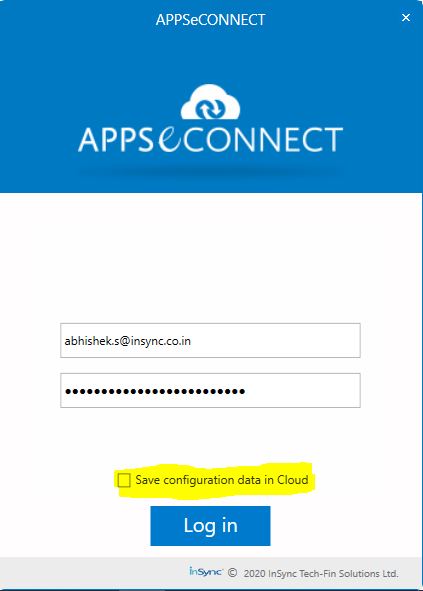
- If you have installed an on-premise agent, when you log in, you will get an option to secure transaction data.
- Just check this before login, and you are done.
- If you have faced disaster or installed it in a fresh machine, you can use the “Download Settings” menu to download the last backed up data.
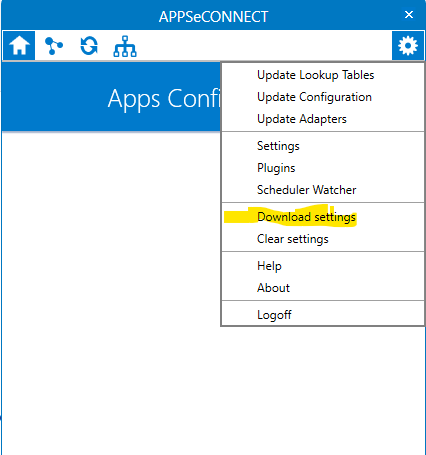
- You can download the files and restart the agent to take them into effect.
4. Use end-to-end Encryption in Data Transfer
End-to-end encryption is a technique to encrypt the data on transit and decrypt only from the installed agent, thereby ensuring the data is secure without enabling anyone in transit to read it. With this feature, your machine generates a secure key and updated it to the server on your account in a secure vault. Now when your machine calls for data, the will be encrypted using the local key both in server or in an agent before transit.
If you want to regenerate the security key again use the “Update your Encryption Policy” option from Profile-> Security Settings.

5. Deactivate Environments that are not in Use
After you are sure that you are not using an environment, it is important to block it to release the license from the account. This will ensure that the machine can never interact with our servers and also remove any sensitive data present in the environment.
To do this, follow the steps:
- Open https://portal.appseconnect.com and go to Deploy -> Environments.
- In the environment section, select the environment which you don’t need anymore.
- Select Detach from menu to the environment, which will block the environment from connecting APPSeCONNECT.
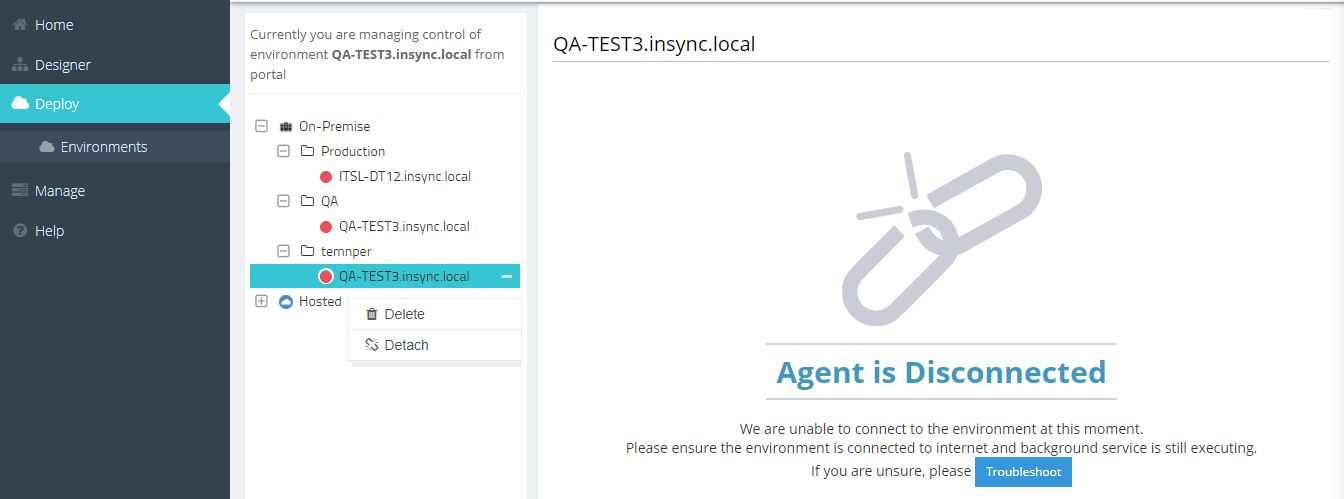
- After you detach, it can never be connected again from the environment using an on-premise Agent.
If you choose Delete instead of Detach, you can reinstall agent again on the environment again to start connecting to APPSeCONNECT. Choose Detach only when you never want anyone from connecting from this environment.
Conclusion
Security is an important concern for any application. Even though there are a lot of security features enabled in the platform, some are optional and you need to enable them yourself. I hope these features in APPSeCONNECT will let you make your account in APPSeCONNECT more secure.
Feel free to comment if you have any.
Thanks
APPSeCONNECT is a smart and robust business application integration platform that seamlessly connects all your business applications with each other to streamline operations and facilitate the free flow of data across the platforms. By moving into the region of iPaaS, APPSeCONNECT proves to be a best-in-the-class platform that easily connects systems and automates the business process.
Now, you can easily connect all your business applications under one single platform to automate the business process!


