


For enterprises to secure their success in the future, they need business process automation, and by going beyond the integration of standard core business applications, enterprises can unlock several new opportunities for themselves. By implementing a system to integrate Microsoft Dynamics 365 CRM with Elementor forms, a company can gain access to such new functionalities that can automate and streamline its lead generation process.
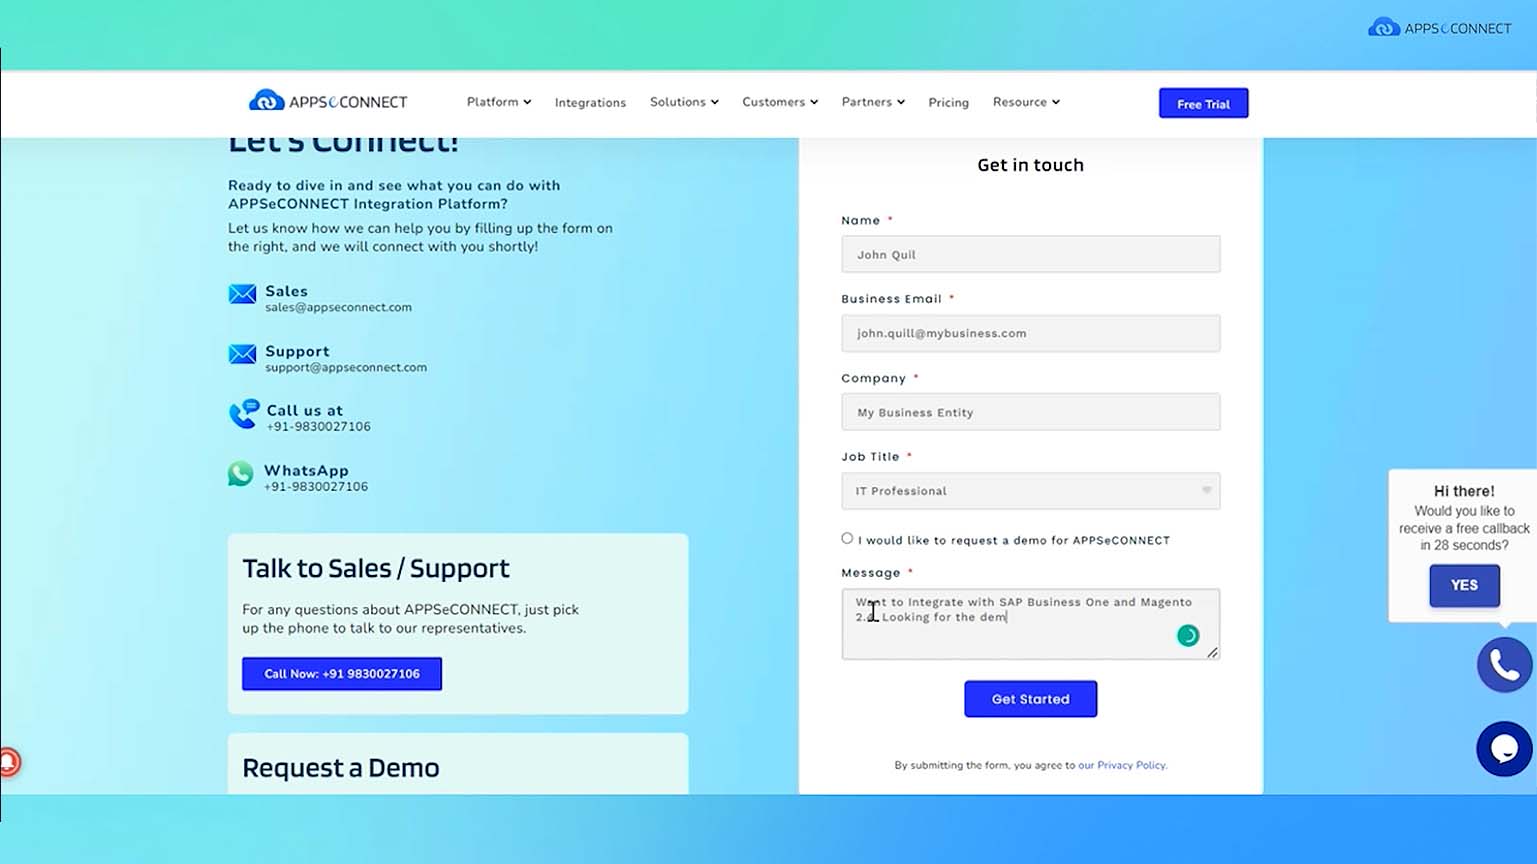
With the barebones features and functionalities offered by the default editor for WordPress for building websites, you need a more powerful solution on top of it to make something more complex. To cater to these needs, Elementor offers an excellent intuitive drag-and-drop editor that enables you to build more sophisticated and visually stunning websites effortlessly. One of the features offered by Elementor is Elementor Form, which can be implemented on a webpage to collect details on website visitors. On the other hand, Microsoft Dynamics 365 CRM is one of the industry-leading CRM solutions, used by enterprises across the industry to manage their customers. By integrating Microsoft Dynamics 365 CRM with Elementor forms companies streamline the transfer of data from the forms to the CRM and gain faster actionable insights into their customers.
With the help of APPSeCONNECT’s smart iPaaS features, we can easily deploy a seamless integration between Microsoft Dynamics 365 CRM and Elementor forms. Let us look into the steps for implementing the integration.
Check out our tutorial video to get a step-by-step guide for the entire process.

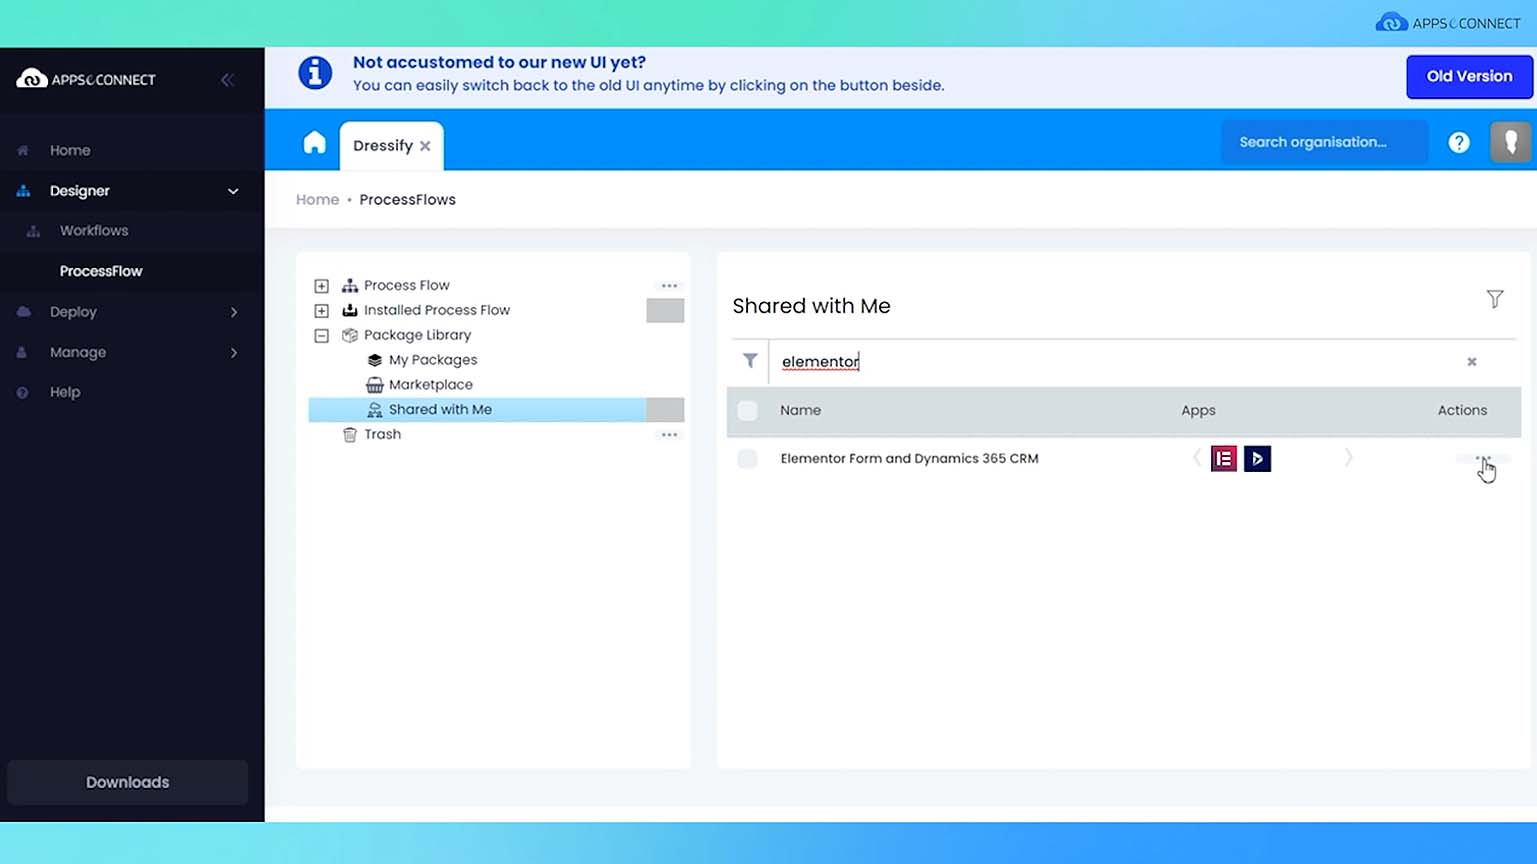
 3. Click on the “+” icon and under the Shared with Me section you can search and find the Elementor Form and Dynamics 365 CRM package.
4. Click on the context menu and then select Install.
3. Click on the “+” icon and under the Shared with Me section you can search and find the Elementor Form and Dynamics 365 CRM package.
4. Click on the context menu and then select Install.
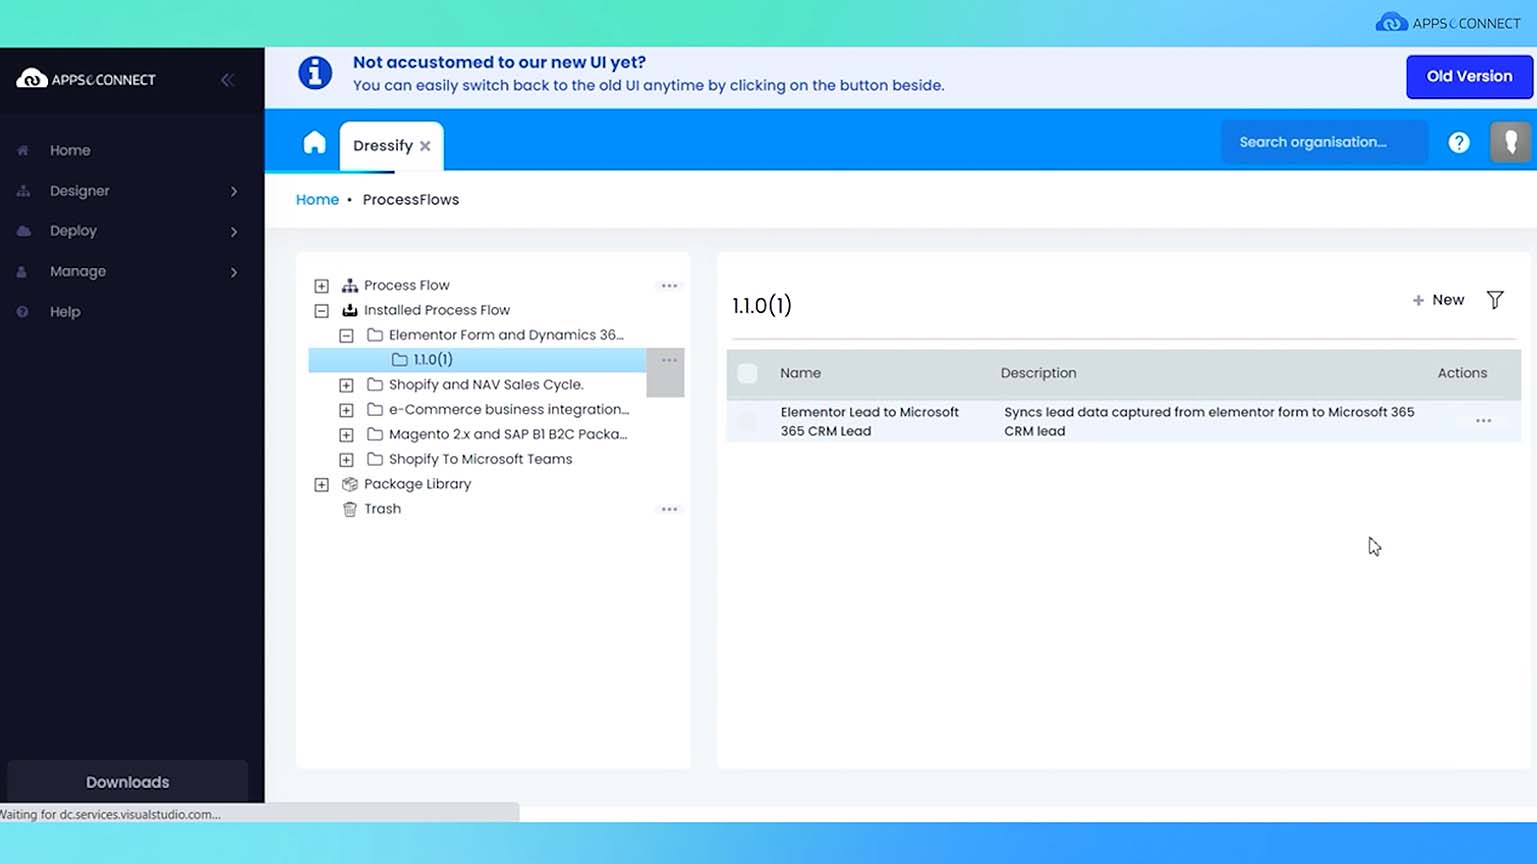
 5. Once the installation is complete, under the Installed ProcessFlow section you can check the Elementor Form and Dynamics 365 folder to see if the package was installed correctly.
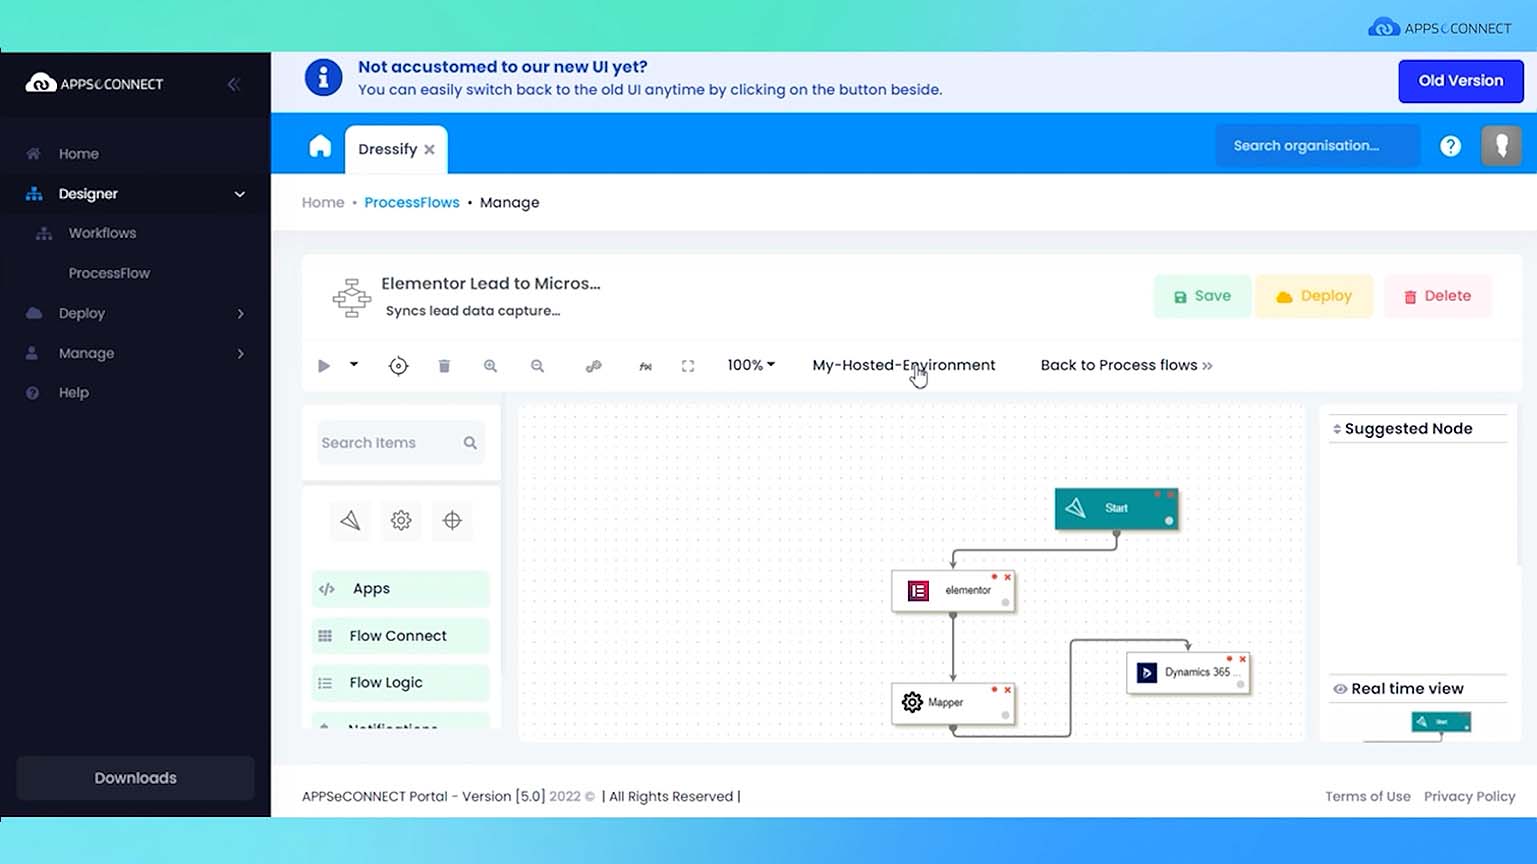
6. Under the Elementor Form and Dynamics 365 folder select the 1.1.0(1) folder and then from the context menu select the Edit option. This will open the ProcessFlow for it.
5. Once the installation is complete, under the Installed ProcessFlow section you can check the Elementor Form and Dynamics 365 folder to see if the package was installed correctly.
6. Under the Elementor Form and Dynamics 365 folder select the 1.1.0(1) folder and then from the context menu select the Edit option. This will open the ProcessFlow for it.
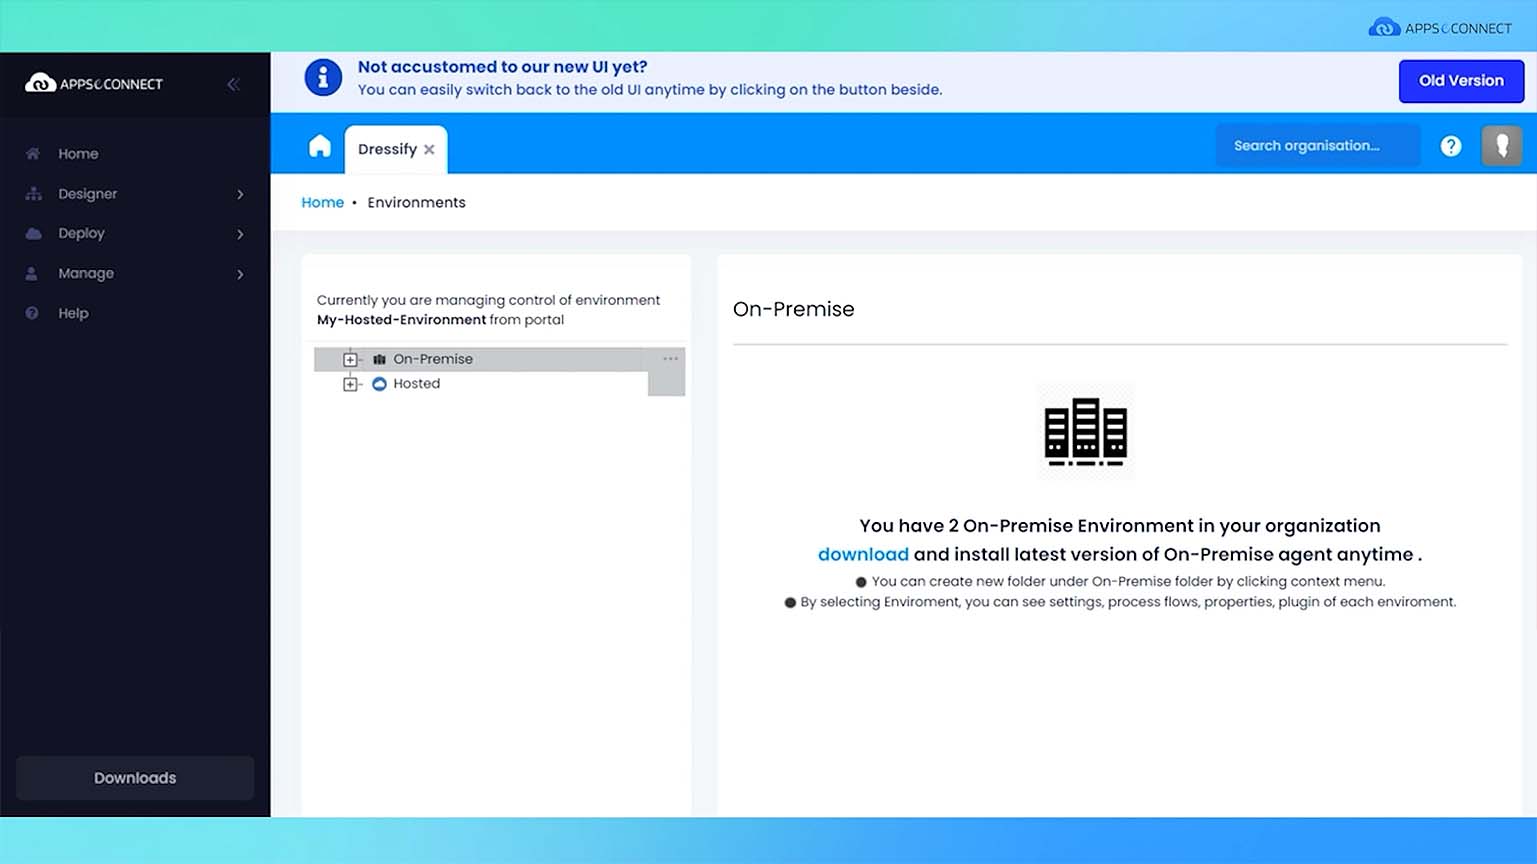
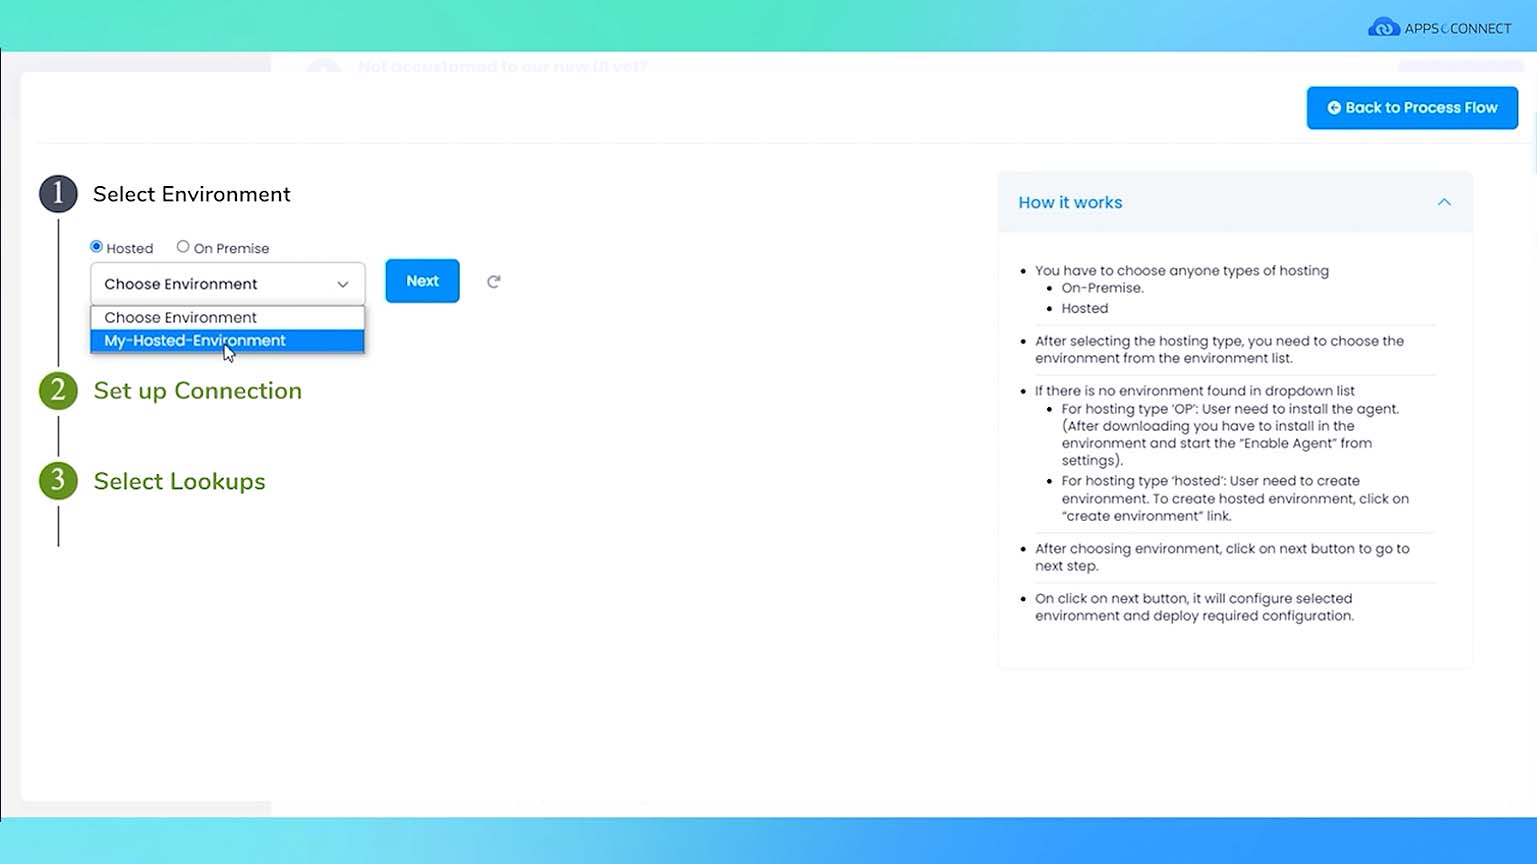
 7. Once the ProcessFlow Visual Integration Designer is loaded, select Deploy and select your preferred deployment environment from the Choose Environment dropdown menu, then click on Next. For our example, we are selecting My-Hosted-Environment.
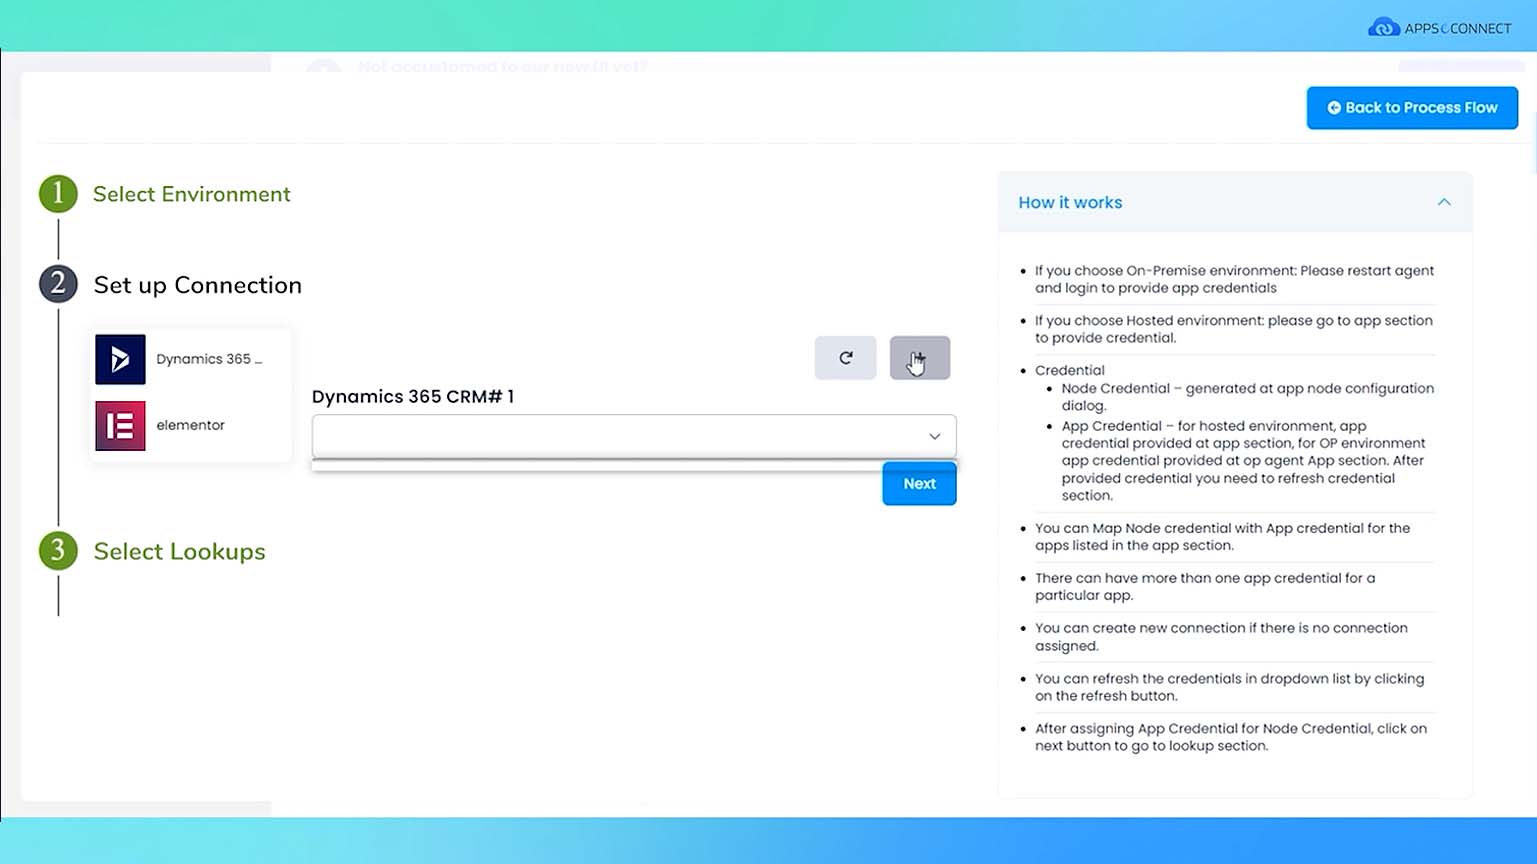
 8. Under Set up Connection, select Dynamics 365 CRM and then click on the “+” icon to set up credentials.
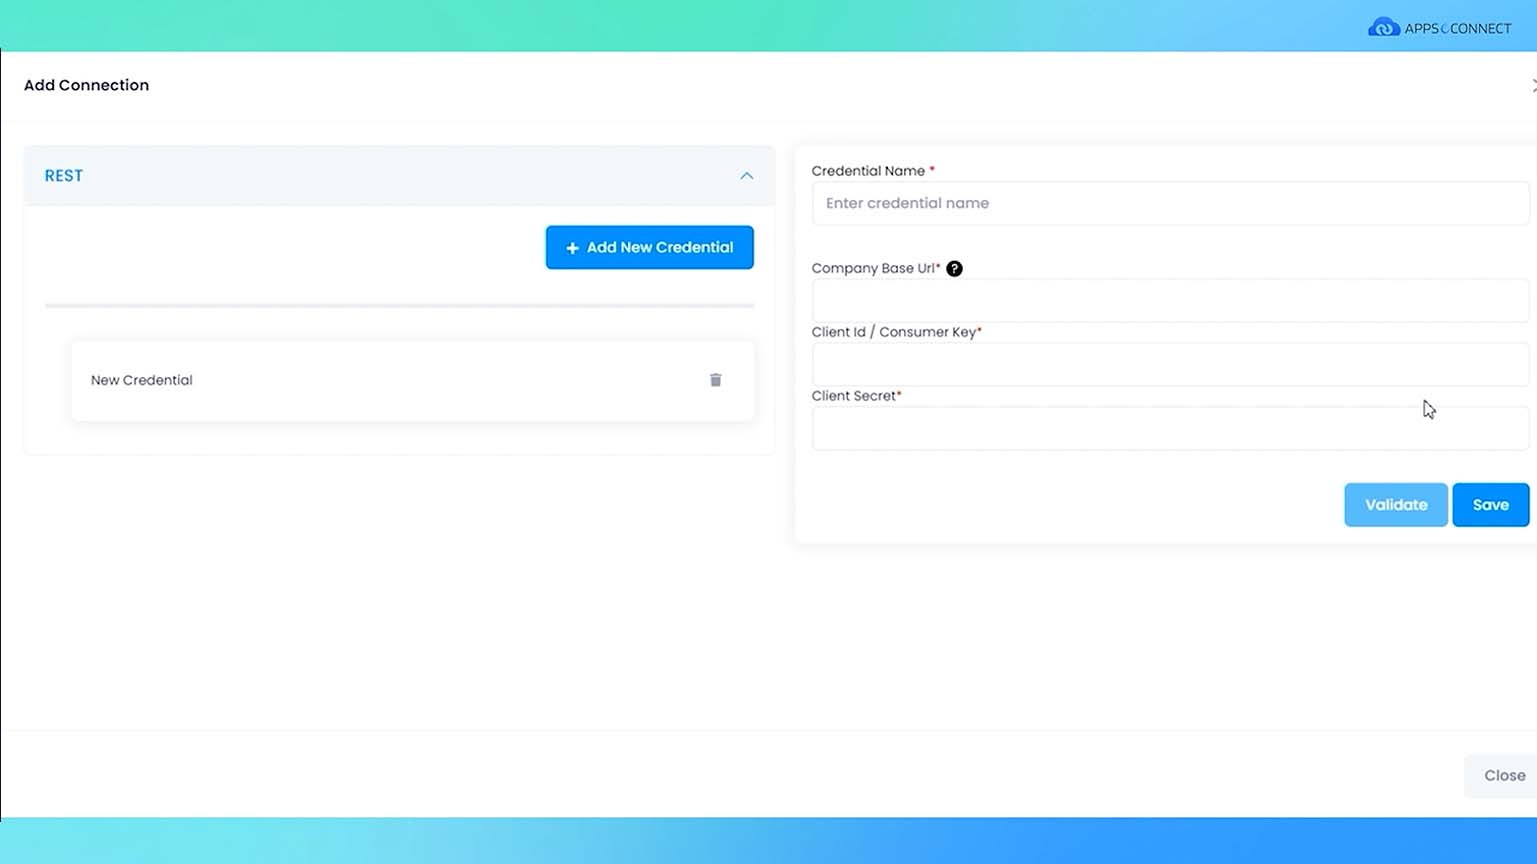
 9. Clicking on the “+” icon will open the Add Connection screen where you can click on the “Add New Credential” button to set up a new credential and create it by filling out the details on the right. Click on Save to save the created credential.
 10. Back at the screen for Set up Connection, you can click on the refresh button to show all the credentials created. Select the credential that you have created for Microsoft Dynamics 365 CRM.
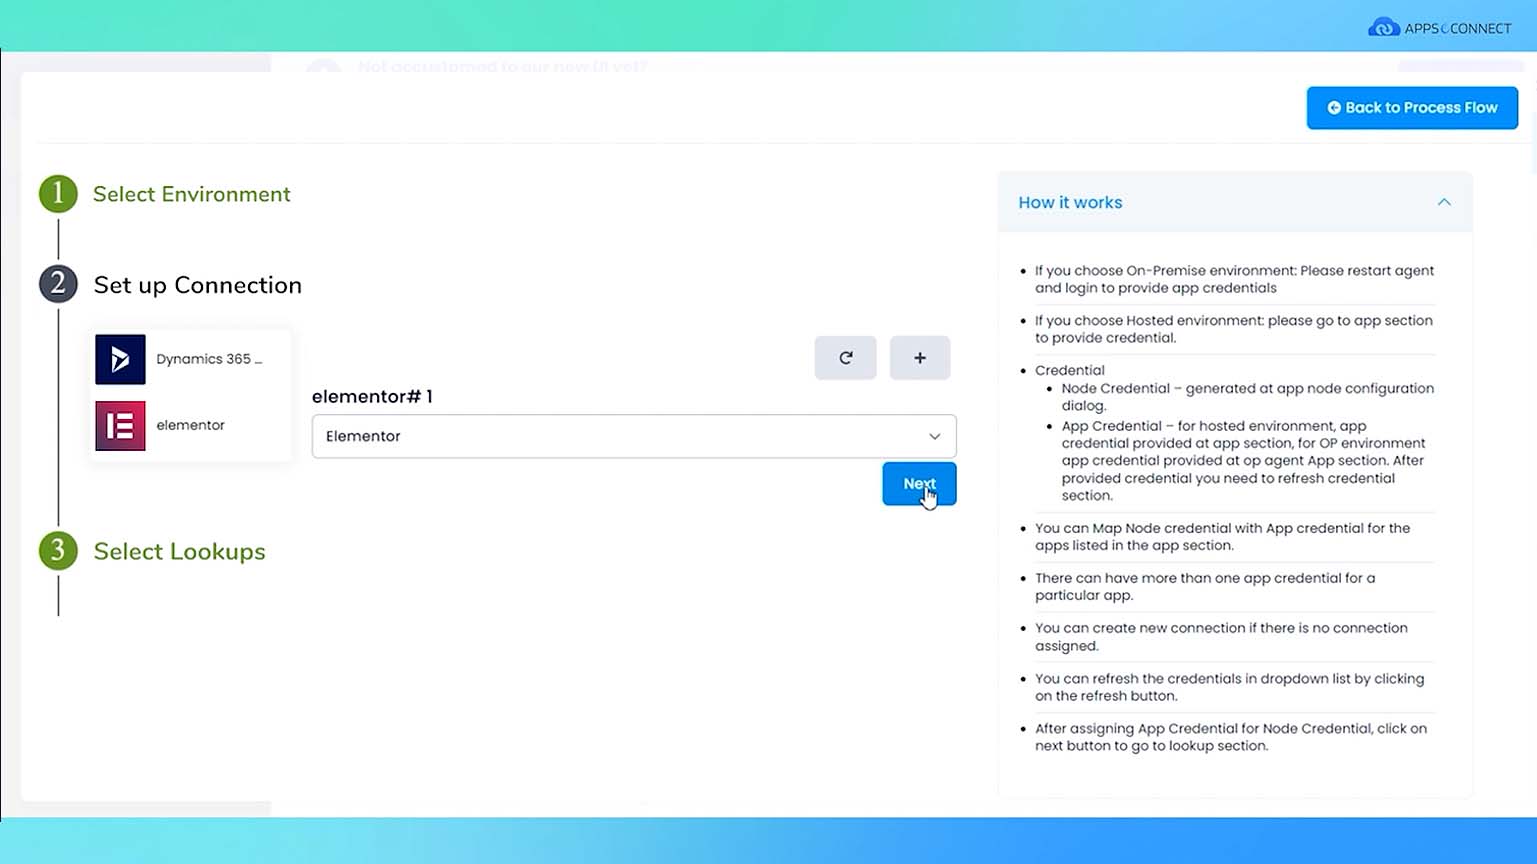
11. Select Elementor and then select the credentials created for it from the dropdown menu. Click on next and then on Finish.
10. Back at the screen for Set up Connection, you can click on the refresh button to show all the credentials created. Select the credential that you have created for Microsoft Dynamics 365 CRM.
11. Select Elementor and then select the credentials created for it from the dropdown menu. Click on next and then on Finish.
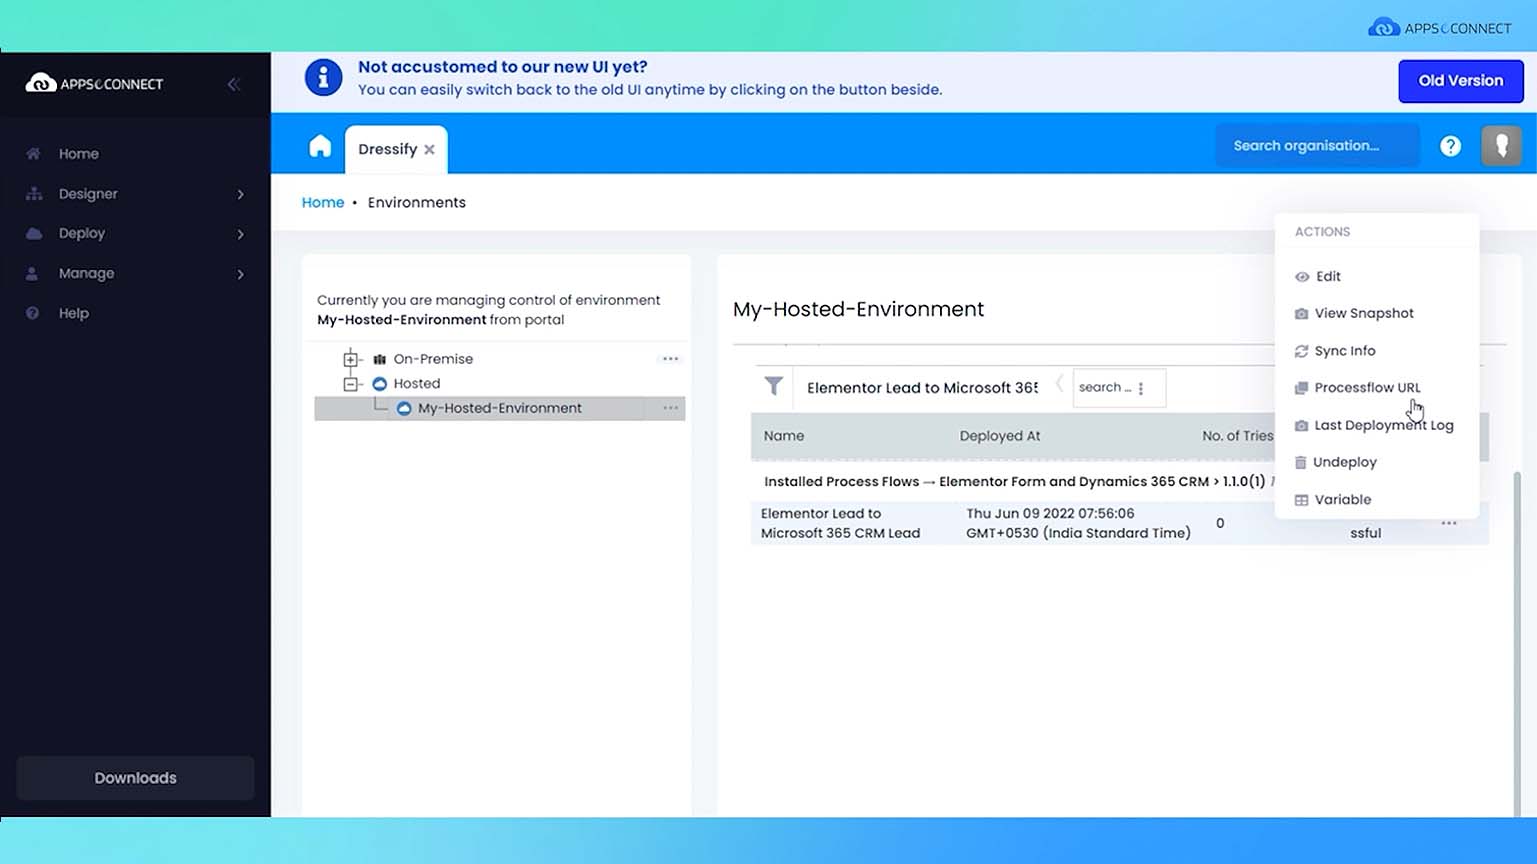
 12. Once the ProcessFlow is deployed you need to get the Webhook URL. In Elementor you have the option to configure into which URL where the data given to the Elementor form gets posted, for which you need the Webhook URL. To get the URL, click on My-Hosted-Environment, which will open a new browser tab for the Deployments list for that particular environment.
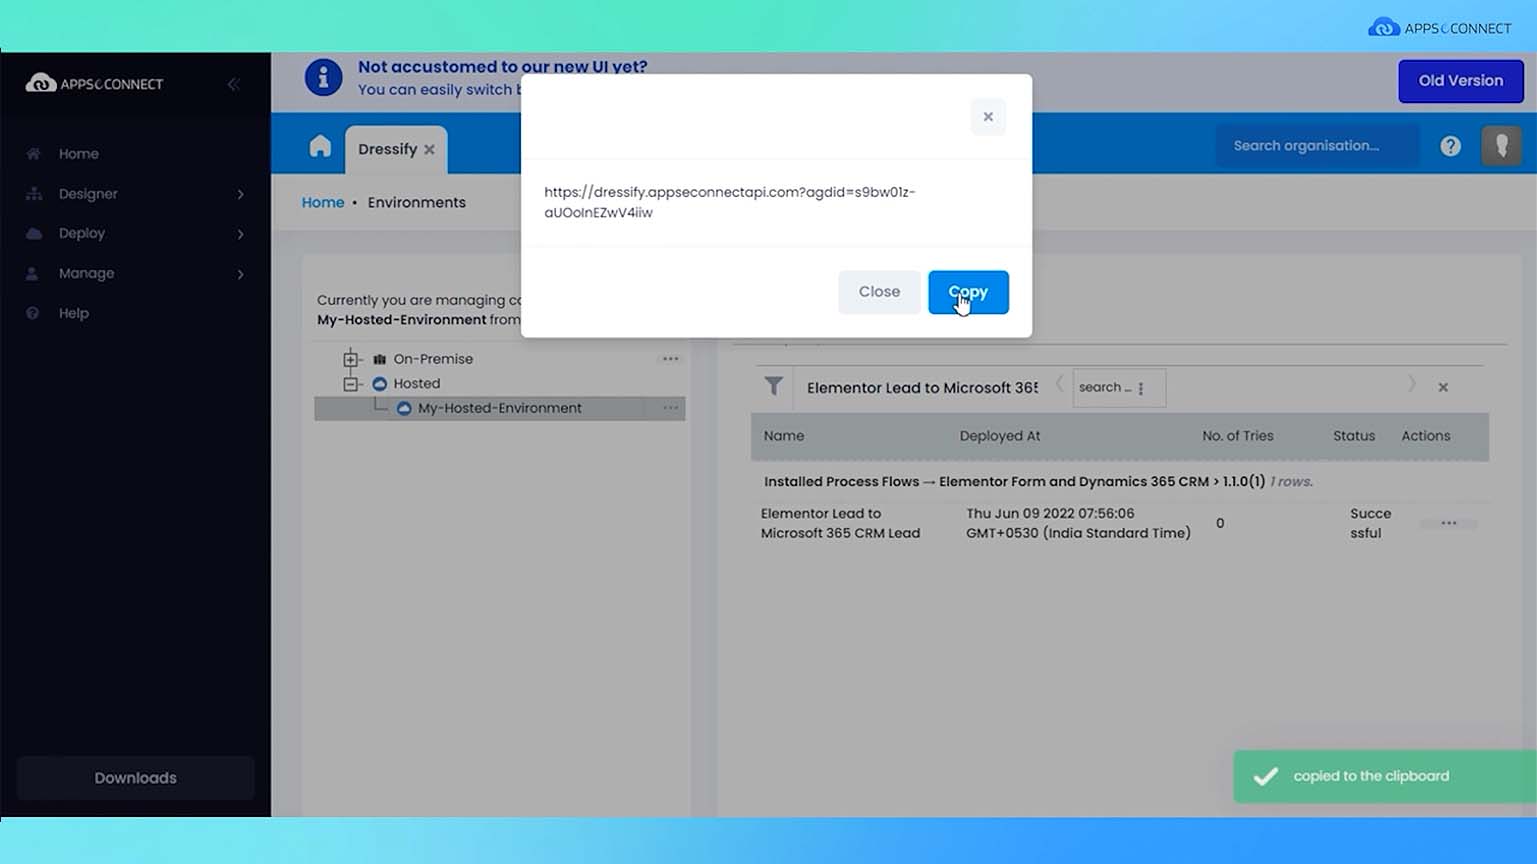
13. Under the Installed ProcessFlows section, click on the context menu for the created ProcessFlow and then select the ProcessFlow URL option. A popup will appear containing the URL which can be copied and then pasted into the Elementor configuration section.
12. Once the ProcessFlow is deployed you need to get the Webhook URL. In Elementor you have the option to configure into which URL where the data given to the Elementor form gets posted, for which you need the Webhook URL. To get the URL, click on My-Hosted-Environment, which will open a new browser tab for the Deployments list for that particular environment.
13. Under the Installed ProcessFlows section, click on the context menu for the created ProcessFlow and then select the ProcessFlow URL option. A popup will appear containing the URL which can be copied and then pasted into the Elementor configuration section.
 Now that we have created the ProcessFlow between Microsoft Dynamics 365 CRM and Elementor, and have the ProcessFlow URL, we will go to Elementor to set up the Elementor Form.
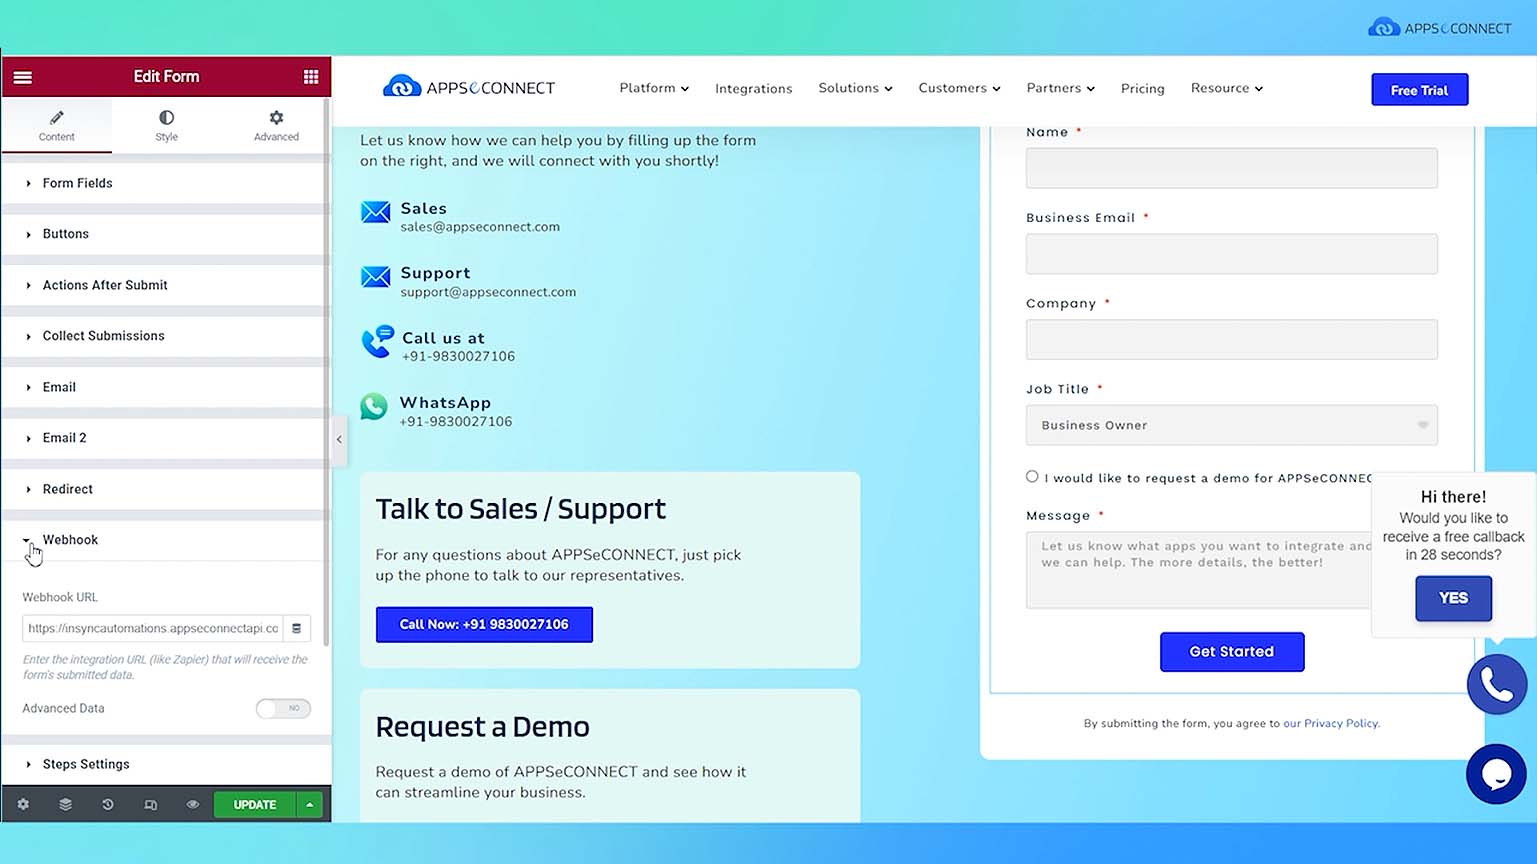 3. Select Webhook, which will open a field to enter the Webhook URL.
4. Paste the generated Webhook URL into the given field and then click on update to complete the process.
With that, the Elementor Form is now integrated with Microsoft Dynamics 365 CRM. Now we can fill in the details in the Elementor Form and see the data get synchronized to the CRM solution.
3. Select Webhook, which will open a field to enter the Webhook URL.
4. Paste the generated Webhook URL into the given field and then click on update to complete the process.
With that, the Elementor Form is now integrated with Microsoft Dynamics 365 CRM. Now we can fill in the details in the Elementor Form and see the data get synchronized to the CRM solution.
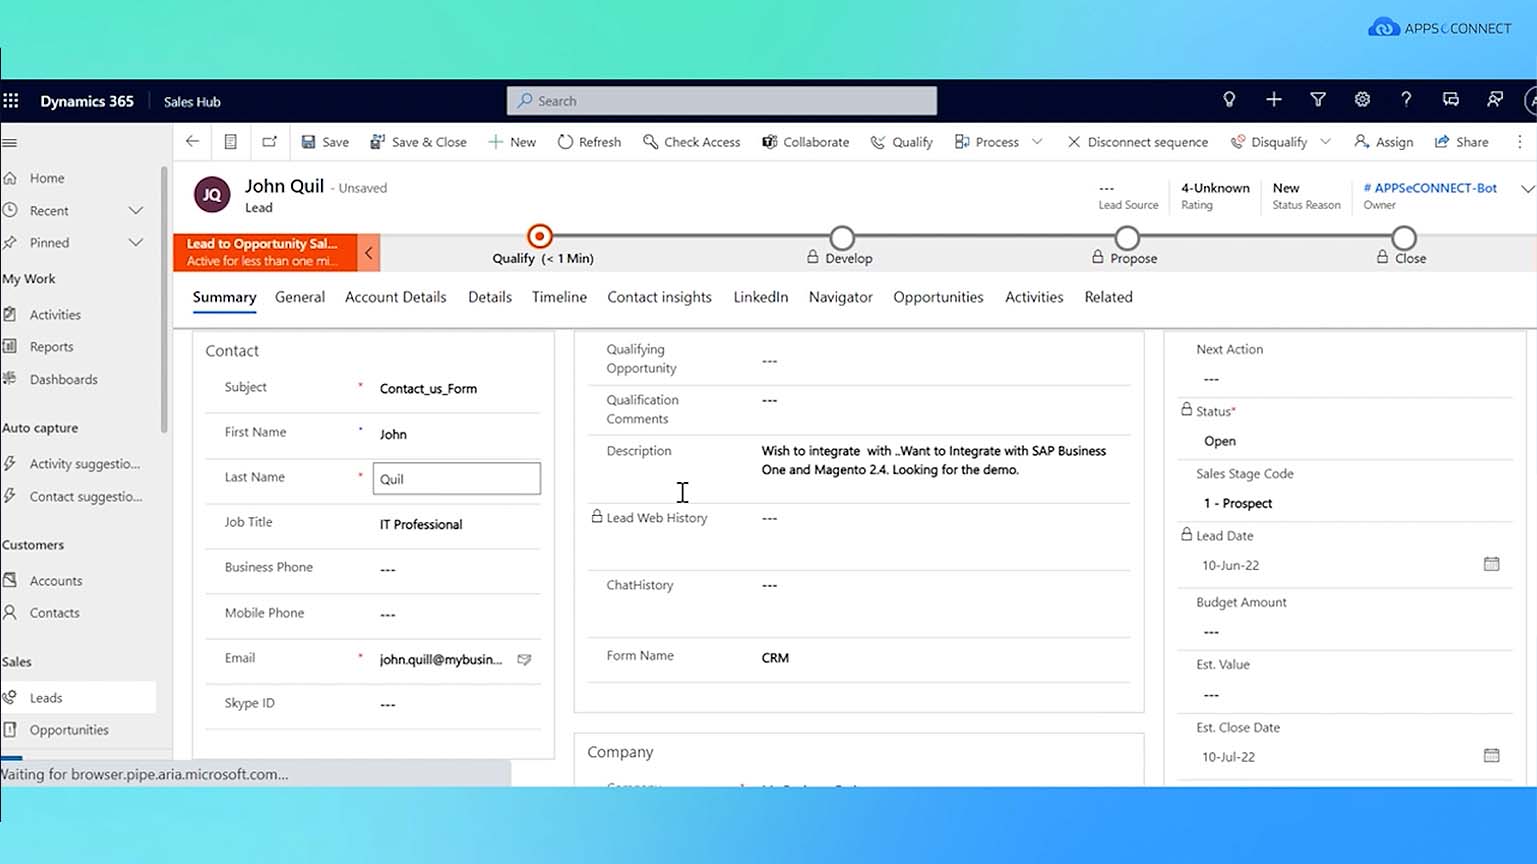 Now, we can log in to the CRM and see that the data was successfully synchronized.
Steps to Integrate Microsoft Dynamics 365 CRM with Elementor Forms
To set up the integration, use the following steps: 1. Log in to the APPSeCONNECT Portal 2. Go to the ProcessFlow tab and under ProcessFlow go to the Package Library.
3. Click on the “+” icon and under the Shared with Me section you can search and find the Elementor Form and Dynamics 365 CRM package.
4. Click on the context menu and then select Install.
5. Once the installation is complete, under the Installed ProcessFlow section you can check the Elementor Form and Dynamics 365 folder to see if the package was installed correctly.
6. Under the Elementor Form and Dynamics 365 folder select the 1.1.0(1) folder and then from the context menu select the Edit option. This will open the ProcessFlow for it.
7. Once the ProcessFlow Visual Integration Designer is loaded, select Deploy and select your preferred deployment environment from the Choose Environment dropdown menu, then click on Next. For our example, we are selecting My-Hosted-Environment.
8. Under Set up Connection, select Dynamics 365 CRM and then click on the “+” icon to set up credentials.
9. Clicking on the “+” icon will open the Add Connection screen where you can click on the “Add New Credential” button to set up a new credential and create it by filling out the details on the right. Click on Save to save the created credential.
10. Back at the screen for Set up Connection, you can click on the refresh button to show all the credentials created. Select the credential that you have created for Microsoft Dynamics 365 CRM.
11. Select Elementor and then select the credentials created for it from the dropdown menu. Click on next and then on Finish.
12. Once the ProcessFlow is deployed you need to get the Webhook URL. In Elementor you have the option to configure into which URL where the data given to the Elementor form gets posted, for which you need the Webhook URL. To get the URL, click on My-Hosted-Environment, which will open a new browser tab for the Deployments list for that particular environment.
13. Under the Installed ProcessFlows section, click on the context menu for the created ProcessFlow and then select the ProcessFlow URL option. A popup will appear containing the URL which can be copied and then pasted into the Elementor configuration section.
Now that we have created the ProcessFlow between Microsoft Dynamics 365 CRM and Elementor, and have the ProcessFlow URL, we will go to Elementor to set up the Elementor Form.
Elemetor Forms Setup for Microsoft Dynamics 365 CRM Integration
For this the steps are as follows: 1. We go to the landing page and then open the Elementor Editor panel and then select the Elementor form. 2. Scroll down in the Edit Form tab and then select Actions After Submit and then click on the “+” button then choose Webhook from the dropdown menu. This will enable the Webhook option for the Elementor Editor.
3. Select Webhook, which will open a field to enter the Webhook URL.
4. Paste the generated Webhook URL into the given field and then click on update to complete the process.
With that, the Elementor Form is now integrated with Microsoft Dynamics 365 CRM. Now we can fill in the details in the Elementor Form and see the data get synchronized to the CRM solution.
Now, we can log in to the CRM and see that the data was successfully synchronized.
Conclusion
Through the integration of the form with the CRM solution, companies can enhance their customer journey experience by increasing their responsiveness and gaining better insights into the requirements of their customers. The integration also streamlines the lead generation process by allowing companies to focus their resources more on interested leads that are more likely to become customers. The integration brings in several quality-of-life features that are indisposable for companies looking to accelerate their business growth. If you are looking to connect all your other line-of-business applications with Microsoft Dynamics 365 CRM, then implement the intelligent, low-code integrations for Microsoft Dynamics 365 CRM from APPSeCONNECT and unlock unprecedented scalable business growth!