Sometimes we may require the data stored in the field of an object to be the value obtained by performing few calculations on some other fields or by merging some fields and it is difficult to calculate field value for each record every time and also in few cases you may want to save the record only if it meets your requirement. So, here formula comes to the picture which will automatically determine the value of the field based on the given condition. Formulas are used in many areas in Salesforce such as Validation rules, workflow rules, process builder, etc. Users cannot change the value of a formula field manually. In this article, we will be explaining the formula field creation using formula editor and examples.
Are you ready to try our
Creating a Formula In Salesforce
To create a formula, Salesforce provides a formula editor with inbuilt functions, operators, provide the feature to insert the required field, and also with the feature to debug the formula. To create a formula field in an object (eg: Opportunity) follow the below steps:
- Click on Opportunity object.
- Click on View fields from the left sidebar.
- Click New. Select Formula as a data type.
- Enter the Field label name and select the data type you expect your formula will return.
- Click on Next to view the formula editor.
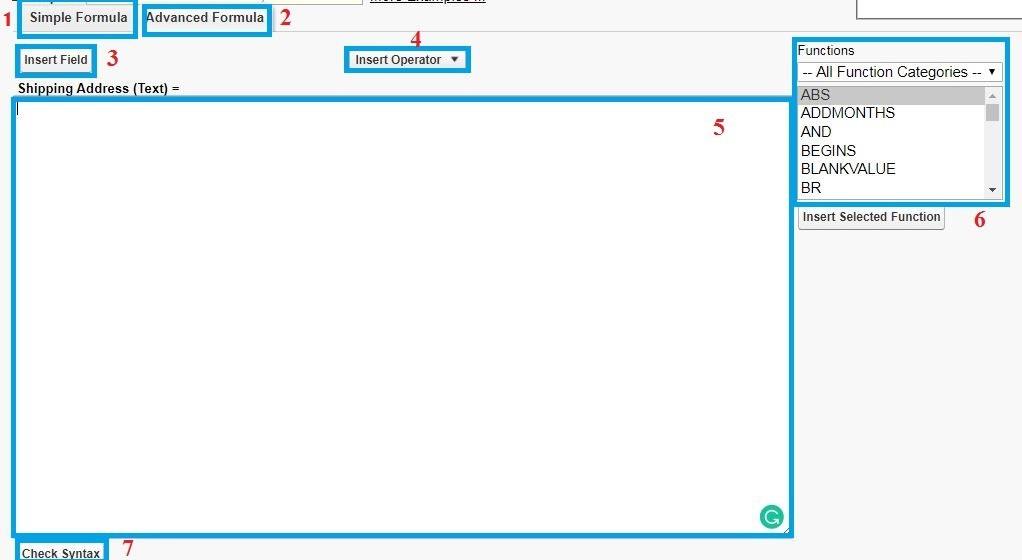
From the above screenshot,
1. The simple formula is one of the formula editors used to perform simple calculations.
2. The advanced formula is used to perform powerful calculations. It has more tools compared to Simple formula. It is always recommended to use advanced formula editor.
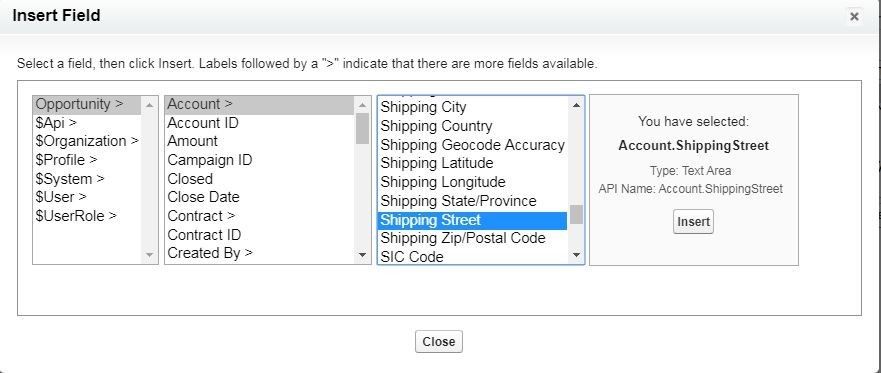
3. The insert field button is used to select the fields to use in the formula. From the below screenshot, we can select the shipping street of the account used to create the opportunity.
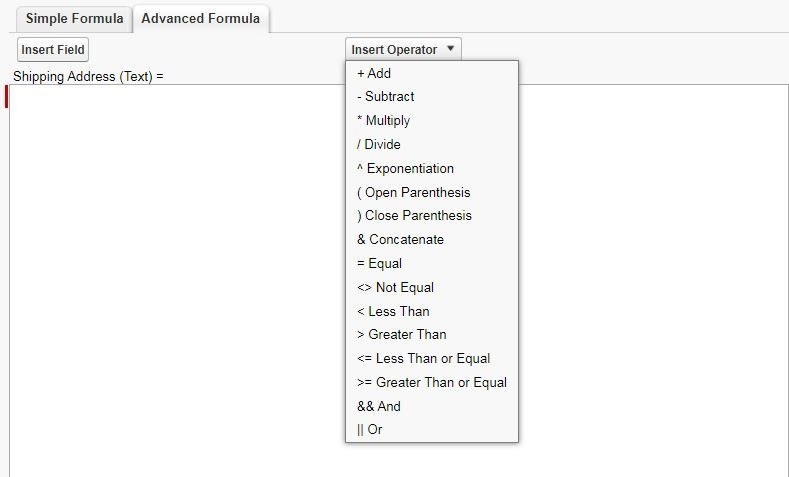
 4. Insert operator is used to selecting the operators from the dropdown menu. The following are the various kinds of operators used in a formula.
-
- Math Operators (+, -, *, /, ^, ())
- Logical Operators (==, ! =, <, >, <=, >=, &&, ||)
- Text Operators (&)
5. Text area in the formula editor to write the formula.
6. Salesforce has some inbuilt functions which can be used to perform complex operations in the formula. Some of the functions are ( for example DATETIMEVALUE returns a year, month, day and GMT time value, ISNUMBER() determines the given text value is a number and returns true if it is, otherwise returns false. The following are the various kinds of inbuilt functions used to write a formula.
- Date and Time functions (DATE, DATEVALUE, DATETIMEVALUE, TODAY, etc.)
- Logical functions (IF, ISBLANK, ISNULL, ISNUMBER, AND, OR etc.)
- Math functions (MAX, MIN, ROUND, FLOOR, etc.)
- Text functions (BEGINS, CONTAINS, INCLUDES, ISPICKVAL, LEFT, RIGHT, etc.)
7. And Check Syntax button is used to debug the formula and returns the error message if there is any syntax error.
Are you ready to try our
Examples:
1. Following is the simple formula to populate a field in the opportunity with the ‘Shipping address’ of an account. Firstly, create a custom formula field to populate the address. In this example, we can directly select the Shipping street, Shipping city, etc. by clicking on the insert field button and concatenate operator (&) is used to merge the Shipping address information of an account. Click on Check Syntax button to debug the formula and it will display an error message if any.
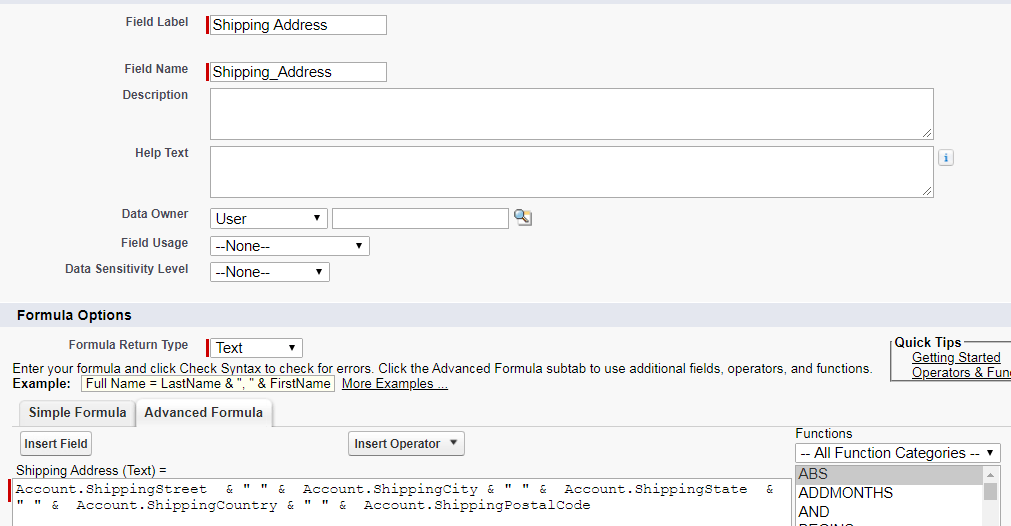
After validating the formula, click on next to add our formula in the layout page and then click on save. To check the action you performed, create an opportunity and the shipping address will be automatically populated with account shipping details.
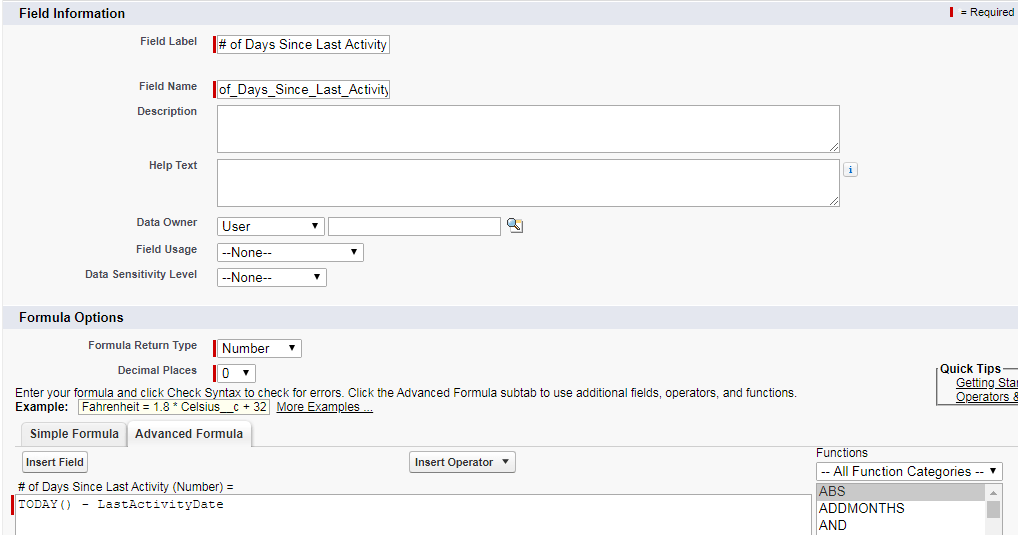
 #2. In this example, let’s populate the field with the number of days since an account is lastly active in Salesforce. To implement this, firstly create custom formula field ‘# of Days since Last Activity’ to populate the days since the account is lastly active. Select the function TODAY from the list of functions that gives the current date and subtract it from the Last Activity which can be inserted by selecting the insert field.
#3. In this example, we will be explaining the usage of formula while creating a validation rule. A validation rule is used to verify the data entered by the user meets the requirement and displays an error message if the user doesn’t meet the requirement. Now let’s create a validation rule to verify that whenever the opportunity stage is changed to ‘Closed Lost’, a user must specify the reason for the lost. To create a validation rule, follow the below steps.
- From Setup, go to Opportunities and then click on Validation rules.
- Click on New button to create a validation rule.
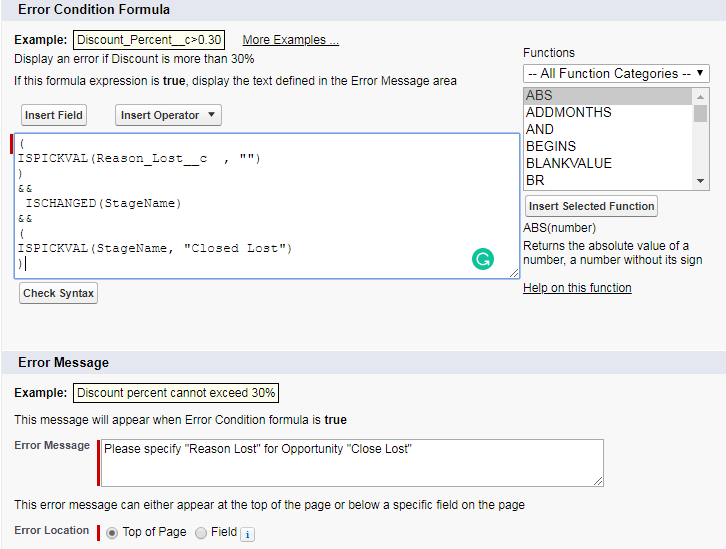
- Enter the rule name, enter the error condition formula, provide an error message to display when error formula condition is true, and select the error location to display the error message on top of the page or beside a field (select the field to display the message).
In the below screenshot, error condition formula will return true if the Reason Lost is empty and the previous value and current value of Stage Name is different and Stage Name is Closed Lost. It displays the error message ‘Please specify the reason for Close Lost’ if the error condition is true.

This article explains about the usage of formula field, formula field editor and with few examples. We sincerely hope that this was useful and any comment or feedback will be very helpful.
Now, you can easily connect your Salesforce CRM with the back-end ERP system to automate the business process!
Are you ready to try our


